
Thymeleaf is a popular server-side template engine for Java-based web applications. In this article, you’ll learn how to create HTML forms in Thymeleaf and handle the form submission on the backend using Spring Boot. If you need more information on working with Thymeleaf in Spring Boot, read this guide.
Thymeleaf fully supports HTML5, so you can easily create a complex HTML form and handle the submission through the Spring Boot controller. For this article, I’ll cover all the core HTML form elements, such as inputs, text areas, checkboxes, radio buttons, and dropdowns.
Dependencies
To use Thymeleaf with Spring Boot, you only need to include spring-boot-starter-web and spring-boot-starter-thymeleaf starter dependencies. For Gradle, add the following dependencies to your build.gradle file:
implementation 'org.springframework.boot:spring-boot-starter-thymeleaf'
implementation 'org.springframework.boot:spring-boot-starter-web'
For Maven, include the below dependencies to the pom.xml file:
<dependency>
    <groupId>org.springframework.boot</groupId>
    <artifactId>spring-boot-starter-thymeleaf</artifactId>
</dependency>
<dependency>
    <groupId>org.springframework.boot</groupId>
    <artifactId>spring-boot-starter-web</artifactId>
</dependency>
If you are starting from scratch, just use Spring Initializr web tool or Spring Boot CLI to bootstrap a new Spring Boot project with the above dependencies.
Java Model Class
Let us first create a simple Java model class named Project.java that stores information about web projects:
Project.java
public class Project implements Serializable {

    private Long id;
    private String title;
    private String type;
    private String color;
    private String description;
    private Integer days;
    private Double price;
    private Boolean featured;
    @DateTimeFormat(iso = DateTimeFormat.ISO.DATE_TIME)
    private LocalDateTime launchDate;

    // constructor, getters, and setters removed for brevity
}
Spring Boot Controller
In a Spring Boot web application, all HTTP requests are handled by a controller class. Such a class is annotated with the @Controller annotation to indicate that it is a web controller.
Let us create a Spring Boot controller class called ProjectController.java that defines two HTTP end-points to handle different GET and POST requests:
ProjectController.java
@Controller
public class ProjectController {

    @GetMapping("/create-project")
    public String createProjectForm(Model model) {

        model.addAttribute("project", new Project());
        return "create-project";
    }

    @PostMapping("/save-project")
    public String saveProjectSubmission(@ModelAttribute Project project) {

        // TODO: save project in DB here

        return "result";
    }
}
As you can see above, our controller class contains two methods. The createProjectForm() function is bound to handle GET requests at the /create-project HTTP end-point and simply returns the name of the Thymeleaf view (in this case, create-project) to render an HTML form. It uses a Model object to expose a new Project object to the view template.
The second method saveProjectSubmission() handles a POST request on the /save-project end-point once the HTML form is submitted. It receives a Project object that was populated by the form. Since the Project object is bind using the @ModelAttribute annotation, you can access it in the view template and display the result.
In a real-world scenario, you might want to persist the Project object in a database like MySQL using Spring Data JPA.
The @GetMapping and @PostMapping annotations map HTTP requests to specific controller methods.
Thymeleaf Templates
Thymeleaf templates are HTML static files that work in web applications and browsers. By default, these templates are stored in src/main/resources/templates/ directory.
Creating an HTML Form
Thymeleaf provides several special attributes to work with HTML forms:
th:field— Used for binding HTML form elements with a property in the form-backing bean.th:object— Used for specifying a model attribute that acts as a command object.th:errors— An attribute that holds all form validation errors.th:errorclass— Used for setting a CSS class to a form input if that field has validation errors.
Let us now create a Thymeleaf template named create-project.html inside the src/main/resources/templates/ folder.
Command Object
The command object is the main form-backing bean attached to the form containing all properties related to input fields. Generally, it is a Java model class with declared getter and setter methods.
The following example demonstrates how you can use the th:object attribute to specify the command object in your <form> tag:
<form th:action="@{/save-project}" th:object="${project}" method="post">
    ...
</form>
There are two crtical things to remember while defining the command object:
- The value of the
th:objectattribute must be a variable expression (${...}) specifying only the name of a model attribute without property navigation. This means that an expression like${project}is valid, but${project.title}would throw an error. - Inside an HTML
<form>tag, you can not define anotherth:objectattribute. This is because the HTML forms can not be nested.
Input & Dropdown Fields
You can easily bind an input field to a property in the bean class using the th:field attribute. This attribute renders differently depending on whether it is attached to an <input>, <select>, or <textarea> tag.
The th:field also considers the type of the <input> tag. Thymeleaf supports all modern HTML5 input types like type="email", type="number", type="color", type="date", etc.
Let us add some input fields to the above <form> tag:
<form th:action="@{/save-project}" th:object="${project}" method="post">
    <div class="form-row">
        <div class="col-md-6 form-group">
            <label>Project ID</label>
            <input type="number" class="form-control" th:field="*{id}">
        </div>
        <div class="col-md-6 form-group">
            <label>Title</label>
            <input type="text" class="form-control" th:field="*{title}">
        </div>
        <div class="col-md-6 form-group">
            <label>Type</label>
            <select class="form-control" th:field="*{type}">
                <option value="">Choose...</option>
                <option value="Design">Design</option>
                <option value="Engineering">Engineering</option>
                <option value="Marketing">Marketing</option>
            </select>
        </div>
        <div class="col-md-6 form-group">
            <label>Color</label>
            <input type="color" class="form-control" th:field="*{color}">
        </div>
        <div class="col-md-6 form-group">
            <label>Estimated Price</label>
            <input type="number" step="any" class="form-control" th:field="*{price}">
        </div>
        <div class="col-md-6 form-group">
            <label>Launch Date</label>
            <input type="datetime-local" class="form-control" th:field="*{launchDate}">
        </div>
    </div>
    <div class="form-group">
        <label>Description</label>
        <textarea class="form-control" th:field="*{description}" rows="3"></textarea>
    </div>
</form>
CheckBox & Radio Button Fields
The th:field attribute also allows you to define checkbox and radio button input fields. Let us add a checkbox and radio buttons to the above HTML form:
<div class="col-md-6 form-group">
    <strong>Duration:</strong>
    <div class="form-check form-check-inline">
        <input class="form-check-input" type="radio" th:field="*{days}" id="option1" value="15">
        <label class="form-check-label" for="option1">15 Days</label>
    </div>
    <div class="form-check form-check-inline">
        <input class="form-check-input" type="radio" th:field="*{days}" id="option2" value="30">
        <label class="form-check-label" for="option2">30 Days</label>
    </div>
    <div class="form-check form-check-inline">
        <input class="form-check-input" type="radio" th:field="*{days}" id="option3" value="45">
        <label class="form-check-label" for="option3">45 Days</label>
    </div>
</div>
<div class="col-md-6 form-group">
    <div class="form-check">
        <input class="form-check-input" type="checkbox" th:field="*{featured}" id="featured">
        <label class="form-check-label" for="featured">
            Mark Featured
        </label>
    </div>
</div>
Showing Validation and Error Messages
Thymeleaf also allows us to show validation error messages to the user on the form and field level.
Field Errors
To check if a specific field contains an error, you can use the #fields.hasErrors() method that takes the field expression as a parameter and returns a boolean value indicating whether a validation error exists for that field or not.
Here is an example that appends the error-field class when the title field contains an error:
<input type="text" class="form-control" th:field="*{title}"
                               th:classappend="${#fields.hasErrors('title')} ? 'error-field'">
Alternatively, you can also use a special attribute th:errorclass that appends the specified CSS class to the HTML element if the field contains any error:
<input type="text" class="form-control" th:field="*{title}" th:errorclass="error-field">
You can also obtain and list all the errors associated with a specific field:
<ul>
  <li th:each="error : ${#fields.errors('title')}" th:text="${error}" />
</ul>
Another way to list all errors for a specific field is by using the th:errors attribute. It builds a list with all the errors for the specified field, separated by <br/>:
<p th:if="${#fields.hasErrors('launchDate')}" th:errors="*{launchDate}">Invalid date</p>
All Errors
You can also display all errors that occurred in the form by passing * or all as an argument to the #fields.hasErrors() method to obtain all the errors and iterate them as shown below:
<ul th:if="${#fields.hasErrors('*')}">
  <li th:each="error : ${#fields.errors('*')}" th:text="${error}">error</li>
</ul>
Global Errors
Global errors are not associated with any specific fields in the form. Usually, these errors are added programmatically from the backend side of the application.
To access global errors, you need to pass global as a parameter to the #field.hasErrors() method:
<ul th:if="${#fields.hasErrors('global')}">
  <li th:each="error : ${#fields.errors('global')}" th:text="${error}">error</li>
</ul>
Displaying Results
Finally, create a new Thymeleaf template named result.html to display the results once the form is submitted by the user:
<h2>Result</h2>
<div class="my-3">
    <p><strong>ID:</strong> <span th:text="${project.id}"></span></p>
    <p><strong>Title:</strong> <span th:text="${project.title}"></span></p>
    <p><strong>Type:</strong> <span th:text="${project.type}"></span></p>
    <p><strong>Color:</strong> <span th:text="${project.color}"></span></p>
    <p><strong>Description:</strong> <span th:text="${project.description}"></span></p>
    <p><strong>Days:</strong> <span th:text="${project.days}"></span></p>
    <p><strong>Price:</strong> <span th:text="${project.price}"></span></p>
    <p><strong>Featured:</strong> <span th:text="${project.featured} ? 'Yes' : 'No'"></span></p>
    <p><strong>Launch Date:</strong> <span th:text="${project.launchDate}"></span></p>
</div>
<a th:href="@{/create-project}">Add new project</a>
Running & Testing the Application
To start the Spring Boot application, let us first add the following main application class:
Application.java
@SpringBootApplication
public class Application {

    public static void main(String[] args) {
        SpringApplication.run(Application.class, args);
    }

}
Now execute the following command in your terminal from the root directory of the project to start the application:
$ ./gradlew bootRun
If you use Maven, run the following command:
./mvnw spring-boot:run
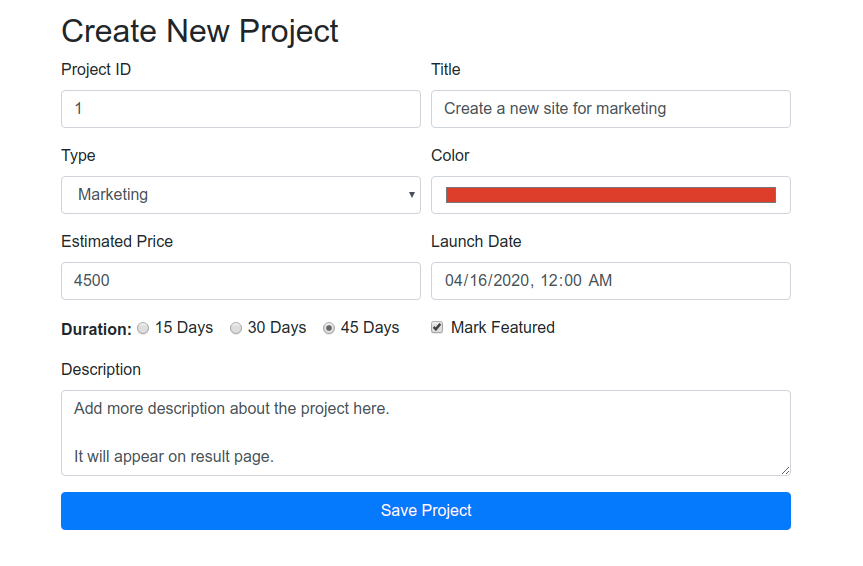
Once the application is started, open http://localhost:8080/create-project in a web browser to view the HTML form. Here is what it looks like:
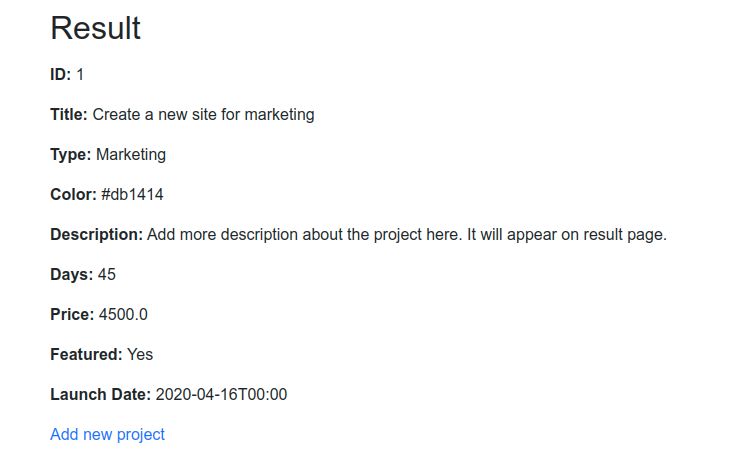
When you fill all input fields and then click the “Save Project” button, you will see the following output:
Source Code: Download the complete source code from GitHub available under MIT license.
Conclusion
That’s all for how to use HTML forms in a Thymeleaf and Spring Boot application. We covered the complete process of creating an HTML form in Thymeleaf, from binding fields with a command object attribute, showing validation errors, handling form submission in the Spring Boot controller, to displaying the result to the user.
Thymeleaf supports all modern HTML5 input types, so you can build a complex HTML form and handle the form submission using a Spring Boot web controller.