
In an earlier article, I wrote about uploading and downloading files using Spring Boot RESTful web services.
In this short article, you’ll learn how to upload a file using Spring Boot and Thymeleaf. If you need more information on how to work with Thymeleaf in Spring Boot, read this guide.
Dependencies
You only need Spring Boot web and Thymeleaf starter dependencies to work with files in a Spring Boot web application. Make sure your build.gradle file includes the following dependencies if you are using Gradle:
implementation 'org.springframework.boot:spring-boot-starter-web'
implementation 'org.springframework.boot:spring-boot-starter-thymeleaf'
For Maven, you need to add the following dependencies to the pom.xml file:
<dependency>
    <groupId>org.springframework.boot</groupId>
    <artifactId>spring-boot-starter-web</artifactId>
</dependency>
<dependency>
    <groupId>org.springframework.boot</groupId>
    <artifactId>spring-boot-starter-thymeleaf</artifactId>
</dependency>
To create a new Spring Boot project from scratch, take a look at how to quickly scaffold a Spring Boot application guide.
Spring Boot Controller
Let us now create a Spring Boot web controller that will be responsible for rendering a Thymeleaf HTML form to allow the user to select and upload a file:
UploadController.java
@Controller
public class UploadController {

    private final String UPLOAD_DIR = "./uploads/";

    @GetMapping("/")
    public String homepage() {
        return "index";
    }

    @PostMapping("/upload")
    public String uploadFile(@RequestParam("file") MultipartFile file, RedirectAttributes attributes) {

        // check if file is empty
        if (file.isEmpty()) {
            attributes.addFlashAttribute("message", "Please select a file to upload.");
            return "redirect:/";
        }

        // normalize the file path
        String fileName = StringUtils.cleanPath(file.getOriginalFilename());

        // save the file on the local file system
        try {
            Path path = Paths.get(UPLOAD_DIR + fileName);
            Files.copy(file.getInputStream(), path, StandardCopyOption.REPLACE_EXISTING);
        } catch (IOException e) {
            e.printStackTrace();
        }

        // return success response
        attributes.addFlashAttribute("message", "You successfully uploaded " + fileName + '!');

        return "redirect:/";
    }

}
As you can see above, we have defined two methods to handle HTTP requests. The homepage() method handles HTTP GET requests on the / end-point and returns the name of the Thymeleaf template that should be displayed to the user.
The uploadFile() method is the one that actually handles the file upload. It accepts multipart/form-data POST requests on the /upload end-point and saves the file on the local file system.
If no file is selected by the user, it simply redirects the user to the upload form with a message that asks the user to select a file.
We are using Java NIO API’s Files.copy() static method to copy the contents of the upload file to another file with the same name in the UPLOAD_DIR directory.
By design, the copy operation fails if the target already exists or is a symbolic link. Therefore, we used the REPLACE_EXISTING option from standard copy options that replaces the target file if it already exists.
The MultipartFile interface is a data structure provided by Spring Boot that represents an uploaded file in a multipart request. The file contents are either stored in memory or temporarily on the disk.
Note: Make sure that the
UPLOAD_DIRexists on the local file system. Otherwise, aNoSuchFileExceptionexception will be thrown.
Thymeleaf Template
The next step is to create a Thymeleaf template called index.html in the src/main/resources/templates folder. It will be a simple template that displays an HTML form to allow the user to select and upload a file from the computer.
The index.html file has the following structure:
<!DOCTYPE html>
<html lang="en" xmlns:th="http://www.thymeleaf.org">
<head>
    <title>Spring Boot & Thymeleaf File Upload</title>
    <link rel="stylesheet" href="https://stackpath.bootstrapcdn.com/bootstrap/4.4.1/css/bootstrap.min.css">
</head>
<body>

<section class="my-5">
    <div class="container">
        <div class="row">
            <div class="col-md-8 mx-auto">
                <h2>Upload File Example</h2>
                <p th:text="${message}" th:if="${message ne null}" class="alert alert-primary"></p>
                <form method="post" th:action="@{/upload}" enctype="multipart/form-data">
                    <div class="form-group">
                        <input type="file" name="file" class="form-control-file">
                    </div>
                    <button type="submit" class="btn btn-primary">Upload File</button>
                </form>
            </div>
        </div>
    </div>
</section>

</body>
</html>
Multipart File Size
By default, Spring Boot’s maximum file upload size is 1MB. If you try to upload a larger file, a MaxUploadSizeExceededException exception will be thrown.
However, you can easily configure the maximum file upload size in your Spring Boot application through the following multipart properties:
# max file size - default 1MB
spring.servlet.multipart.max-file-size=10MB
# max request size - default 10MB
spring.servlet.multipart.max-request-size=25MB
Running & Testing the Application
To launch the Spring Boot application, you need to first add the main application class (if it doesn’t already exist) as shown below:
build.gradle
@SpringBootApplication
public class Application {

    public static void main(String[] args) {
        SpringApplication.run(Application.class, args);
    }

}
Now execute the following command in your terminal from the root directory of the project to start the application:
$ ./gradlew bootRun
If you use Maven, execute the following command:
./mvnw spring-boot:run
Once the application is started, open http://localhost:8080/ in a web browser to view the HTML form. Here is what it looks like:

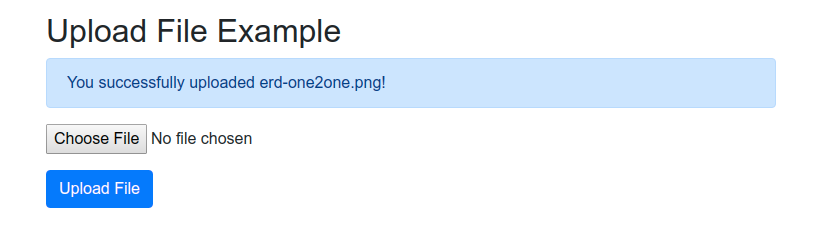
Next, select a file from your computer and click the “Upload File” button to start the upload process. If everything goes right, you will see the following message displayed on the screen:
Conclusion
In this article, I’ve explained a step-by-step process to upload a file using Spring Boot and Thymeleaf. This example uses an HTML web form to select and upload a file in Spring Boot. If you are looking for a way to upload a file asynchronously through a RESTful web service, check out this guide.
Want to use jQuery to upload a file in Spring Boot? Read how to upload a file with Ajax in Spring Boot guide.