
Spring Boot provides the MultipartFile interface to handle HTTP multipart requests for uploading files. In this tutorial, I will show you how to upload and download files using Spring Boot RESTful web services.
Note: This article uses RESTful web services to upload and download files in Spring Boot. If you are using Thymeleaf with Spring Boot and want to upload a file, read this guide.
Dependencies
We only need spring-boot-starter-web and spring-boot-starter-thymeleaf starter dependencies for our example Spring Boot project. We do not need any extra dependency for file upload. Here is what our build.gradle file looks like:
build.gradle
plugins {
 id 'org.springframework.boot' version '2.1.3.RELEASE'
 id 'java'
}

apply plugin: 'io.spring.dependency-management'

group = 'com.attacomsian'
version = '0.0.1-SNAPSHOT'
sourceCompatibility = '1.8'

repositories {
 mavenCentral()
}

dependencies {
 implementation 'org.springframework.boot:spring-boot-starter-thymeleaf'
 implementation 'org.springframework.boot:spring-boot-starter-web'
}
I used Spring Initializr to generate the above Gradle configuration file. It is an easier and quicker way to create a Spring Boot application.
Configure Properties
Before we start the actual work, we need to configure two things:
- The location on the server where the uploaded files are stored.
- The largest size of the file uploaded in a single HTTP multipart request.
Spring Boot automatically enables multipart/form-data requests, so we do not need to do anything.
application.properties
# max file size
spring.servlet.multipart.max-file-size=10MB
# max request size
spring.servlet.multipart.max-request-size=10MB
# files storage location (stores all files uploaded via REST API)
storage.location=./uploads
In the above properties file, we have two multipart settings:
spring.servlet.multipart.max-file-sizeis set to 10MB, which means total files size cannot exceed 10MB.spring.servlet.multipart.max-request-sizesets the maximummultipart/form-datarequest size to 10MB.
In simple words, we cannot upload files larger than 10MB using the above configuration.
Enable Configuration Properties
In our application.properties file, we define the storage location. Now let’s create a POJO class called StorageProperties and annotate it with @ConfigurationProperties to automatically bind the properties declared in the application.properties file.
StorageProperties.java
package com.attacomsian.uploadfiles.storage;

import org.springframework.boot.context.properties.ConfigurationProperties;

@ConfigurationProperties(prefix = "storage")
public class StorageProperties {

 private String location;

 public String getLocation() {
 return location;
 }

 public void setLocation(String location) {
 this.location = location;
 }

}
Notice the prefix= "storage" attribute in the above annotation. It instructs @ConfigurationProperties to bind all the properties that start with the storage prefix to their corresponding attributes of the POJO class when the application is started.
The next step is to enable the ConfigurationProperties feature by adding the @EnableConfigurationProperties annotation to our main configuration class.
Application.java
package com.attacomsian.uploadfiles;

import com.attacomsian.uploadfiles.storage.StorageProperties;
import org.springframework.boot.SpringApplication;
import org.springframework.boot.autoconfigure.SpringBootApplication;
import org.springframework.boot.context.properties.EnableConfigurationProperties;

@SpringBootApplication
@EnableConfigurationProperties(StorageProperties.class)
public class Application {

 public static void main(String[] args) {
 SpringApplication.run(Application.class, args);
 }

}
Files Upload Controller
Let’s now create a controller class called FileController for handling uploading and downloading files via RESTful web services. It also defines a route to list all the uploaded files.
FileController.java
package com.attacomsian.uploadfiles.controllers;
import com.attacomsian.uploadfiles.commons.FileResponse;
import com.attacomsian.uploadfiles.storage.StorageService;
import org.springframework.core.io.Resource;
import org.springframework.http.HttpHeaders;
import org.springframework.http.ResponseEntity;
import org.springframework.stereotype.Controller;
import org.springframework.ui.Model;
import org.springframework.web.bind.annotation.*;
import org.springframework.web.multipart.MultipartFile;
import org.springframework.web.servlet.support.ServletUriComponentsBuilder;
import java.util.Arrays;
import java.util.List;
import java.util.stream.Collectors;
@Controller
public class FileController {
private StorageService storageService;
public FileController(StorageService storageService) {
this.storageService = storageService;
}
@GetMapping("/")
public String listAllFiles(Model model) {
model.addAttribute("files", storageService.loadAll().map(
path -> ServletUriComponentsBuilder.fromCurrentContextPath()
.path("/download/")
.path(path.getFileName().toString())
.toUriString())
.collect(Collectors.toList()));
return "listFiles";
}
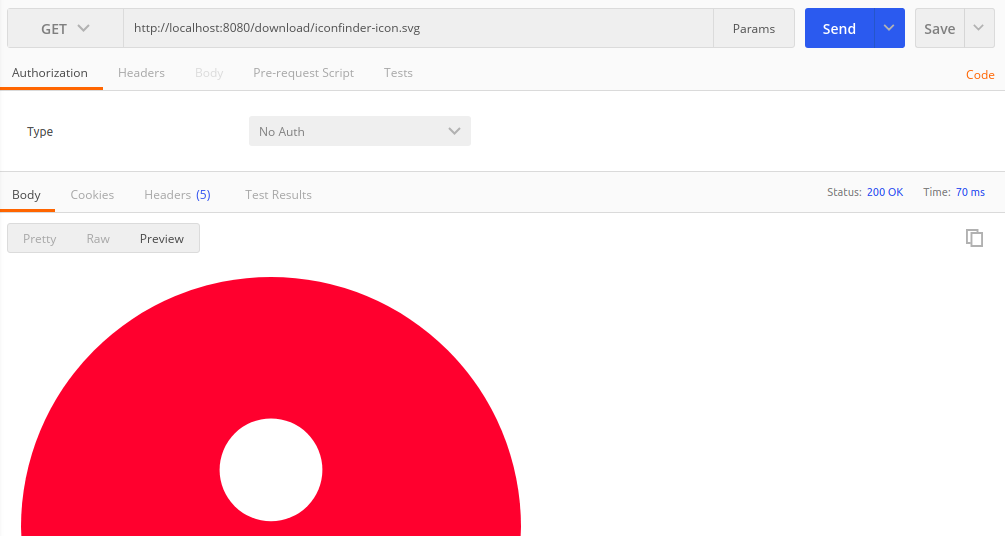
@GetMapping("/download/{filename:.+}")
@ResponseBody
public ResponseEntity<Resource> downloadFile(@PathVariable String filename) {
Resource resource = storageService.loadAsResource(filename);
return ResponseEntity.ok()
.header(HttpHeaders.CONTENT_DISPOSITION,
"attachment; filename=\"" + resource.getFilename() + "\"")
.body(resource);
}
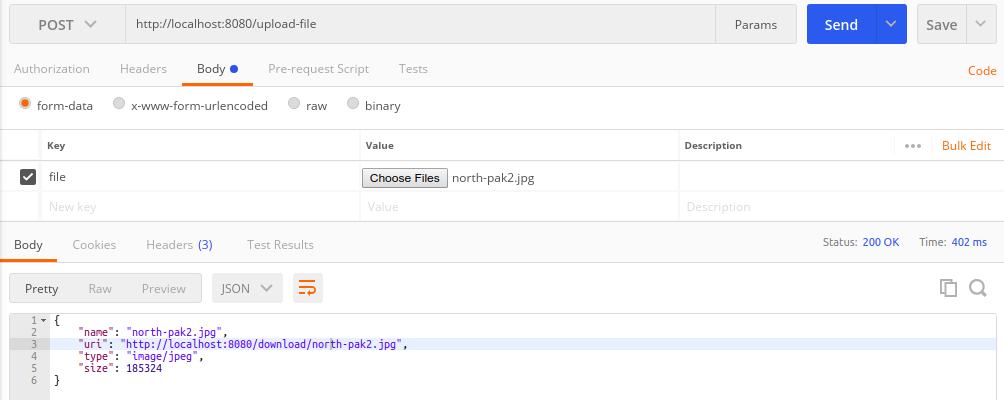
@PostMapping("/upload-file")
@ResponseBody
public FileResponse uploadFile(@RequestParam("file") MultipartFile file) {
String name = storageService.store(file);
String uri = ServletUriComponentsBuilder.fromCurrentContextPath()
.path("/download/")
.path(name)
.toUriString();
return new FileResponse(name, uri, file.getContentType(), file.getSize());
}
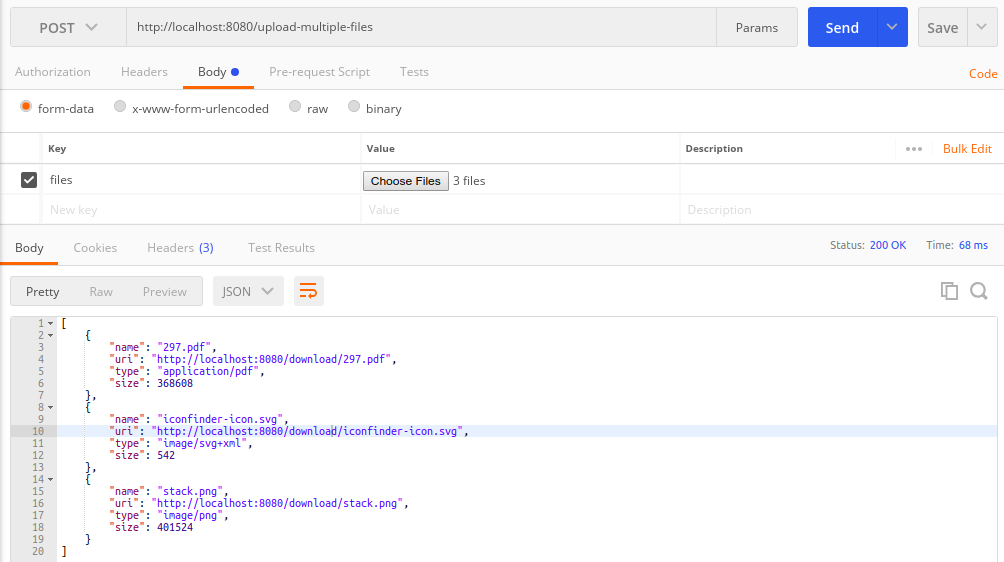
@PostMapping("/upload-multiple-files")
@ResponseBody
public List<FileResponse> uploadMultipleFiles(@RequestParam("files") MultipartFile[] files) {
return Arrays.stream(files)
.map(file -> uploadFile(file))
.collect(Collectors.toList());
}
}
As always, our controller class is annotated with @Controller to let the Spring Framework pick it up for routes. Each method is decorated with @GetMapping or @PostMapping to bind the path and the HTTP action with that particular method.
- GET
/loads the current list of uploaded files and renders it into a Thymeleaf template calledlistFiles.html. - POST
/download/{filename}resolves the resource if it exists and sends it to the browser for download.HttpHeaders.CONTENT_DISPOSITIONadds the"Content-Disposition"response header to indicate file attachment. - POST
/upload-file&/upload-multiple-filesroutes handle HTTP multipart requests and useStorageServicefor saving files on the server. Both these methods return an object ofFileResponseafter the upload is finished.
The FileResponse class is used to return a JSON response for RESTful web services.
FileResponse.java
package com.attacomsian.uploadfiles.commons;

public class FileResponse {
 private String name;
 private String uri;
 private String type;
 private long size;

 public FileResponse(String name, String uri, String type, long size) {
 this.name = name;
 this.uri = uri;
 this.type = type;
 this.size = size;
 }

 // getters and setters removed for the sake of brevity
}
important The FileController class uses the StorageService interface for storing and resolving files in the file system. It is the main class for handling files in our example. We’ll define these classes in the next section.
Note: On the production server, avoid storing the uploaded files in your application file system. You might lose all files if your application server is damaged. It also makes it very difficult to move the application from one server to another. Therefore, it is a good practice to use external storage like AWS S3 for storing all the uploaded files.
Storage Service
Finally, it is time to create a storage service called StorageService for our controller to connect with a storage layer (the file system in our case). This task involves several classes. We’ll define these classes one by one.
The first step is to define an interface called StorageService as shown below:
StorageService.java
package com.attacomsian.uploadfiles.storage;

import org.springframework.core.io.Resource;
import org.springframework.web.multipart.MultipartFile;

import java.nio.file.Path;
import java.util.stream.Stream;

public interface StorageService {

 void init();

 String store(MultipartFile file);

 Stream<Path> loadAll();

 Path load(String filename);

 Resource loadAsResource(String filename);

 void deleteAll();

}
The above interface declares several abstract methods for initializing, storing, removing, and retrieving files. It only lists possible storage operations without their implementation.
Now, it is up to you to decide how you want to implement them. In this example, we will use our file system for handling files. It can also be implemented to store the files in any external location.
Let’s create a concrete class FileSystemStorageService that implements the StorageService interface.
FileSystemStorageService.java
package com.attacomsian.uploadfiles.storage;

import org.springframework.beans.factory.annotation.Autowired;
import org.springframework.core.io.Resource;
import org.springframework.core.io.UrlResource;
import org.springframework.stereotype.Service;
import org.springframework.util.FileSystemUtils;
import org.springframework.util.StringUtils;
import org.springframework.web.multipart.MultipartFile;

import javax.annotation.PostConstruct;
import java.io.IOException;
import java.io.InputStream;
import java.net.MalformedURLException;
import java.nio.file.Files;
import java.nio.file.Path;
import java.nio.file.Paths;
import java.nio.file.StandardCopyOption;
import java.util.stream.Stream;

@Service
public class FileSystemStorageService implements StorageService {

 private final Path rootLocation;

 @Autowired
 public FileSystemStorageService(StorageProperties properties) {
 this.rootLocation = Paths.get(properties.getLocation());
 }

 @Override
 @PostConstruct
 public void init() {
 try {
 Files.createDirectories(rootLocation);
 } catch (IOException e) {
 throw new StorageException("Could not initialize storage location", e);
 }
 }

 @Override
 public String store(MultipartFile file) {
 String filename = StringUtils.cleanPath(file.getOriginalFilename());
 try {
 if (file.isEmpty()) {
 throw new StorageException("Failed to store empty file " + filename);
 }
 if (filename.contains("..")) {
 // This is a security check
 throw new StorageException(
 "Cannot store file with relative path outside current directory "
 + filename);
 }
 try (InputStream inputStream = file.getInputStream()) {
 Files.copy(inputStream, this.rootLocation.resolve(filename),
 StandardCopyOption.REPLACE_EXISTING);
 }
 }
 catch (IOException e) {
 throw new StorageException("Failed to store file " + filename, e);
 }

 return filename;
 }

 @Override
 public Stream<Path> loadAll() {
 try {
 return Files.walk(this.rootLocation, 1)
 .filter(path -> !path.equals(this.rootLocation))
 .map(this.rootLocation::relativize);
 }
 catch (IOException e) {
 throw new StorageException("Failed to read stored files", e);
 }

 }

 @Override
 public Path load(String filename) {
 return rootLocation.resolve(filename);
 }

 @Override
 public Resource loadAsResource(String filename) {
 try {
 Path file = load(filename);
 Resource resource = new UrlResource(file.toUri());
 if (resource.exists() || resource.isReadable()) {
 return resource;
 }
 else {
 throw new FileNotFoundException(
 "Could not read file: " + filename);
 }
 }
 catch (MalformedURLException e) {
 throw new FileNotFoundException("Could not read file: " + filename, e);
 }
 }

 @Override
 public void deleteAll() {
 FileSystemUtils.deleteRecursively(rootLocation.toFile());
 }
}
The above implementation class is taken from Spring Boot official files uploading example with a few modifications done by me.
The significant change I made is the @PostConstruct annotation on the init() method. It ensures the init() method is only called once the bean is fully initialized with all the dependencies injected.
The FileSystemStorageService class throws exceptions in case of unexpected scenarios. For example, the file requested by the user might not exist.
The StorageException is the first exception thrown when we fail to create the storage directory, or the uploaded file is empty etc.
StorageException.java
package com.attacomsian.uploadfiles.storage;

public class StorageException extends RuntimeException {

 public StorageException(String message) {
 super(message);
 }

 public StorageException(String message, Throwable cause) {
 super(message, cause);
 }
}
The FileNotFoundException exception is thrown when the file requested by the user does not exist on the server.
FileNotFoundException.java
package com.attacomsian.uploadfiles.storage;

import org.springframework.http.HttpStatus;
import org.springframework.web.bind.annotation.ResponseStatus;

@ResponseStatus(HttpStatus.NOT_FOUND)
public class FileNotFoundException extends StorageException {

 public FileNotFoundException(String message) {
 super(message);
 }

 public FileNotFoundException(String message, Throwable cause) {
 super(message, cause);
 }
}
Notice the @ResponseStatus(HttpStatus.NOT_FOUND) annotation above. This annotation ensures that Spring Boot responds with a 404 (Not Found) HTTP status instead of 501 (Internal Server Error) when the exception is thrown.
Running & Testing the Application
We are almost done with our backend development. Since we created RESTful APIs to upload and download files, we can test them via Postman. Let’s run the application by typing the following command in your terminal from the root directory of the project:
$ ./gradlew bootRun
Once the application is started, you can access it at http://localhost:8080.
1. Upload Single File
2. Upload Multiple Files
3. Download File
HTML Web Form
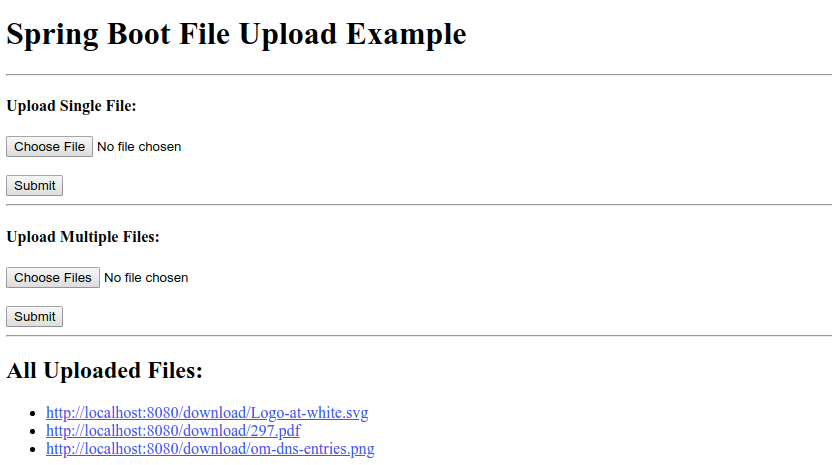
We have tested our RESTful APIs, and they are working fine. It is now time to create a simple front-end interface in HTML & Thymeleaf that lists all the files uploaded so far. It will also allow users to upload files directly from the browser.
listFiles.html
<!doctype html>
<html lang="en" xmlns:th="http://www.thymeleaf.org">
<body>

<h1>Spring Boot File Upload Example</h1>

<hr/>

<h4>Upload Single File:</h4>
<form method="POST" enctype="multipart/form-data" th:action="@{/upload-file}">
 <input type="file" name="file"> <br/><br/>
 <button type="submit">Submit</button>
</form>

<hr/>

<h4>Upload Multiple Files:</h4>
<form method="POST" enctype="multipart/form-data" th:action="@{/upload-multiple-files}">
 <input type="file" name="files" multiple> <br/><br/>
 <button type="submit">Submit</button>
</form>

<hr/>

<h2>All Uploaded Files:</h2>
<ul>
 <li th:each="file : ${files}">
 <a th:href="${file}" target="_blank" th:text="${file}"></a>
 </li>
</ul>

</body>
</html>
The above template has two forms that enable users to upload a single file and multiple files. At the bottom, it also shows a list of currently uploaded files on the server. Here is what it looks like:
Source code: Download the complete source code from GitHub available under MIT license.
Conclusion
That’s all for uploading and downloading files in Spring Boot. We discussed strategies to handle single and multiple files uploads via RESTful web services.
We tested our REST APIs via Postman to confirm that they are working as expected. Finally, we created a simple web interface in HTML and Thymeleaf showing a list of all the uploaded files.